Fortnite Boogie Bomb
- Dec 22, 2020
- 3 min read
Updated: Dec 23, 2020
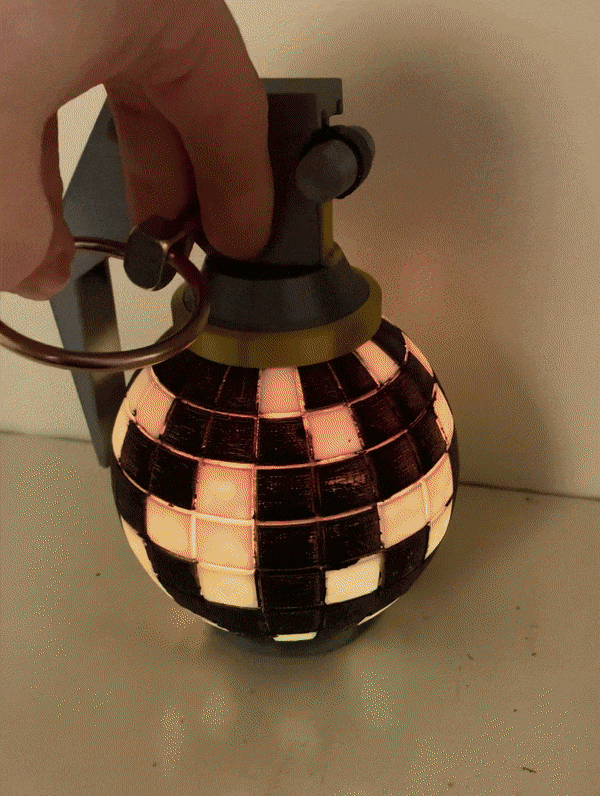


My 8yo niece loves to play Fortnite. She started playing with a friend earlier this year and when she found out my fiance was also into the game, she started calling him to play. Daily. If he wouldn't pick up, she'd call me to see how I was doing and if he could play. Like an 8yo does! I've never played the game myself but I've watched her and listened to the two of them play (and win) together. A few months back, I overheard him telling her to "stop hitting him with a boogie bomb" and I could just tell that she was laughing like crazy on the other end of the line.
When I started searching for a 'Fortnite' gift that I could make for her, I saw The Ray Gun Project's Boogie Bomb on Thingiverse. I knew I had to put it together. I watched the videos and checked out the files. There have been a ton of advancements since the project was originally published so I was itching to update the build.

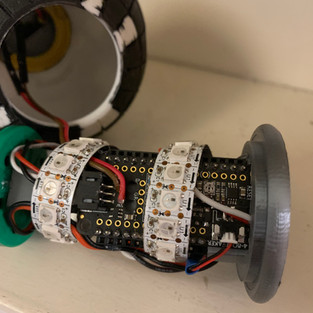
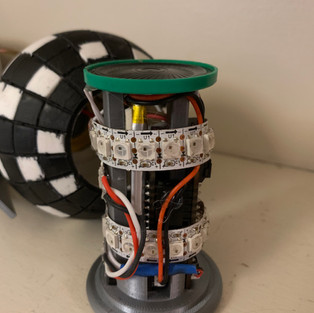
The Adafruit Feather boards all have onboard LiPo charging and remove the need to use the main Trinket board + the LiPo backpack used in this project. Some of the most recent Feather boards, like the Feather M0 or M4 Express boards handle SO much more than the good old ATTINY85 Trinket so that it's a no-brainer. Plus, most of the new boards can be programmed in CircuitPython, which makes it that much easier for my niece to code it herself, if she wants to do so. The Adafruit Prop-Maker FeatherWing connects right into the Feather boards and cuts out the need for the SFX board and amplifier, plus the NeoPixels and the speaker snap right into the board using JST-PH and Picoblade connectors.
In order to use the different set of boards, I had to update CAD files, components, the audio file, & the code.
My remix used most of the original CAD files from "The Ray Gun Project" with two exceptions: The "BB-Core" & the "BB-Core_ButtonCover" were remodeled to account for different components. I printed the files in black, white, gold, and grey/silver, per the original instructions. I ended up printing the "Lever Arm" piece in 100% fill black PETG because it broke the first time around.


I used the following components
NeoPixels (I used 2 x 16 pixel strips of the 144/m variety for a total of 32 pixels)
As I noted above, I utilized the plug in options of the prop-maker board. I connected the Neopixels to the board via the JST PH plug and the speaker via the pico blade connector. Aside from plugging in the speaker, NeoPixels and the battery, I soldered on the on-off power button to the Enable and Ground pins and soldered the MicroSwitch to the Switch and Ground pins on the board.
I generated a cleaner audio file and have included the wave file needed to run the code. The code was developed in CircuitPython.
If I make this project again (for the fiance who might need one now...), I'll use Short Feather headers, though it will require another core redesign. I'll also use an Adafruit Feather M4 Express board instead of the M0 Express board. Though the Feather M0 Express works, the M4 Express would have allowed me a greater selection of options for the LED animations.
The code I developed for this project uses the CircuitPython LED Animations library developed by Kattni Rembor. This library includes a bunch of awesome LED animations, like blink, colorcycle, chase, comet, pulse, sparkles for individual colors or rainbow cycles. From the guide, "most animations will run individually on the SAMD21 (M0) microcontroller boards, but some combinations of animations and the most complex animations will not." I was able to use the plain rainbow cycle and the rainbow comet animations together on the M0, though I wasn't able to use any of the other options.
I've uploaded my stl files to Thingiverse
I've uploaded code to github
Special thanks to Adafruit, thea.codes, & Geek Mom Projects for example code, libraries, code help, and hardware share!


Comments